canonry
Canonry 

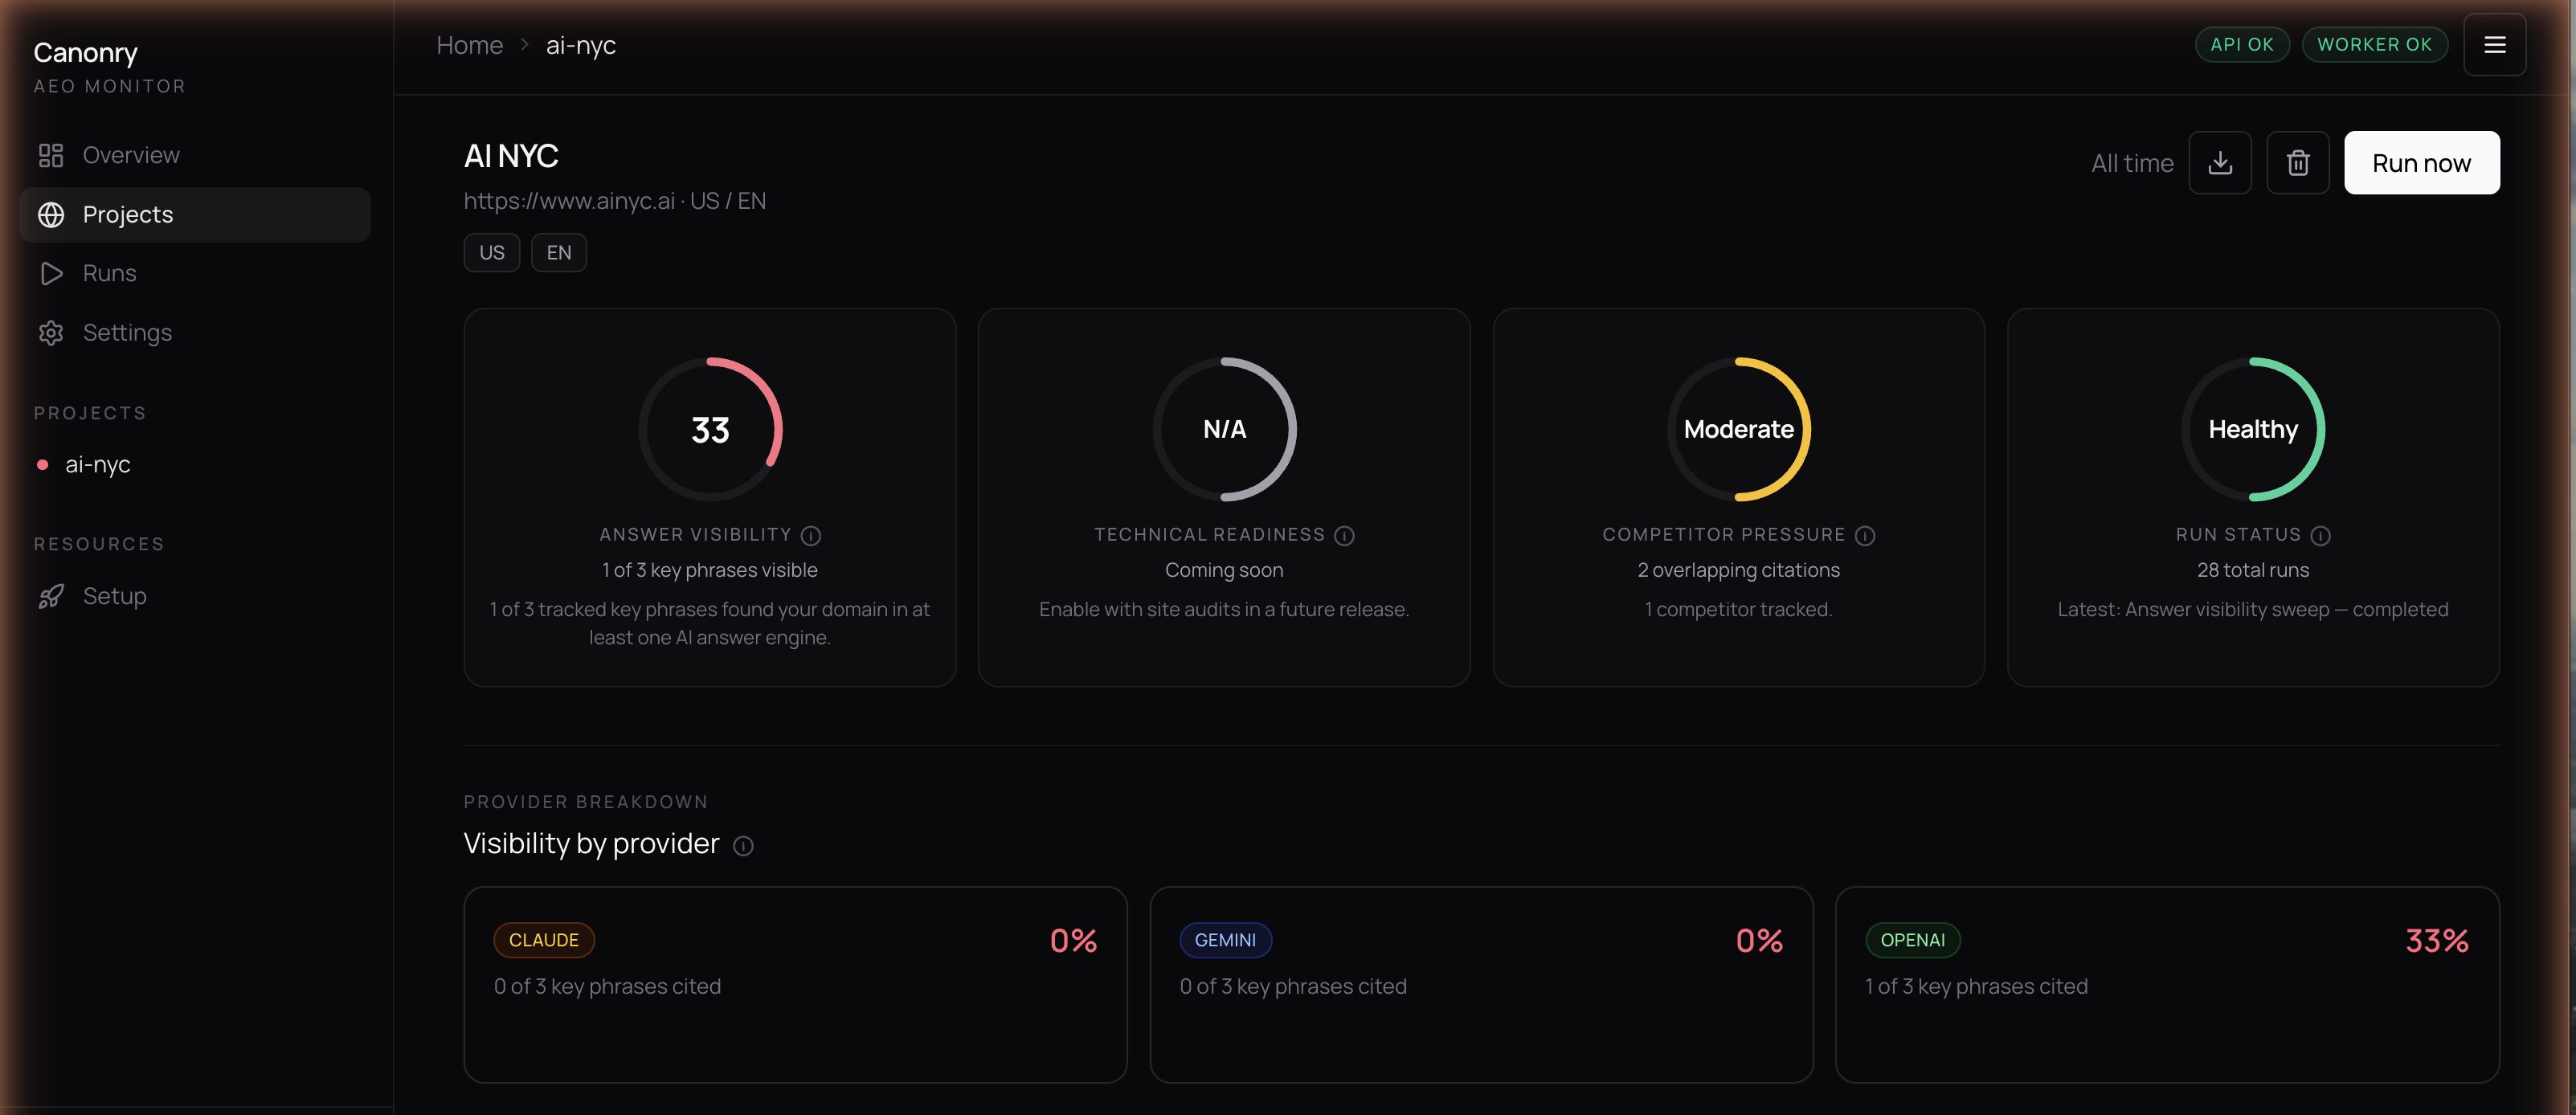
![]()
Agent-first AEO monitoring. Canonry tracks how AI answer engines (ChatGPT, Gemini, Claude, Perplexity, and others) cite or omit your website, and it’s built so that AI agents and automation pipelines can operate it end-to-end without human intervention.
Every capability is exposed through a stable REST API and a machine-readable CLI. An AI agent can install canonry, configure providers, create projects, trigger visibility sweeps, and act on the results. All from a terminal, all scriptable, all JSON-parseable. The web dashboard is there for human analysts, but nothing requires it.
AEO (Answer Engine Optimization) is the practice of ensuring your content is accurately represented in AI-generated answers. As search shifts from links to synthesized responses, monitoring your visibility across answer engines is essential.
Quick Start
npm install -g @ainyc/canonry
canonry init
canonry serve
Open http://localhost:4100 to access the optional web dashboard.
Zero-touch setup for agents and CI
No interactive prompts required. Pass keys as flags or environment variables and canonry configures itself:
# flags
canonry init --gemini-key <key> --openai-key <key>

# environment variables
GEMINI_API_KEY=... OPENAI_API_KEY=... canonry init

# headless bootstrap (env vars only, no prompts, idempotent)
canonry bootstrap
Agent workflow example
A coding agent (Claude Code, Cursor, Copilot, or any MCP-equipped tool) can run an entire monitoring cycle in a single script:
# 1. Install and bootstrap
npm install -g @ainyc/canonry
GEMINI_API_KEY=$KEY canonry bootstrap
canonry start                                # background daemon

# 2. Define a project from a YAML spec
canonry apply canonry.yaml --format json     # declarative, version-controlled

# 3. Trigger a sweep and wait for results
canonry run my-project --wait --format json

# 4. Inspect results programmatically
canonry status my-project --format json      # visibility scores
canonry evidence my-project --format json    # citation evidence
canonry history my-project --format json     # timeline for trend analysis
Every command supports --format json so agents can parse output directly. Error messages include the failed command, the reason, and a suggested fix, so there’s no guesswork.
Why Agent-First?
Canonry is designed so that AI agents and automation pipelines can drive it without human interaction.
- No browser required. The CLI and API cover 100% of functionality.
- Deterministic setup.
canonry bootstrapis idempotent and non-interactive. Run it in CI, in a container, or from an agent with zero human input. - Config-as-code. Kubernetes-style YAML files that agents can generate, version-control, and apply. No forms to fill out.
- Structured output everywhere.
--format jsonon every command. Agents parse results, not humans. - Stable API contract. Endpoints never change paths or methods. Agents can hard-code routes safely.
- Actionable errors. Every failure includes the command that failed, why it failed, and what to do next.
Start with docs/README.md for the full architecture, roadmap, active plans, testing, deployment, and ADR index.
Skills for AI Agents
Canonry ships with an OpenClaw skill that teaches AI agents how to use it. The skill covers CLI commands, provider setup, interpreting results, indexing workflows, and troubleshooting.
Claude Code picks it up automatically from .claude/skills/canonry-setup/ when you open this repo. No configuration needed.
ClawHub hosts the same skill at clawhub.dev so any MCP-equipped agent (Cursor, Windsurf, Copilot, etc.) can discover and install it. Search for canonry on ClawHub, or point your agent at the skills/canonry-setup/ directory in this repo.
Once an agent has the skill loaded, it can set up canonry, run sweeps, interpret citation evidence, and troubleshoot errors without you having to explain any of it.
Features
- Multi-provider monitoring – query Gemini, OpenAI, Claude, Perplexity, and local LLMs (Ollama, LM Studio, or any OpenAI-compatible endpoint) from a single tool.
- Agent-first surfaces – the REST API is canonical, the CLI supports
--format jsonon every command, and the web dashboard is an optional visualization layer. - Config-as-code – manage projects with Kubernetes-style YAML files. Version control your monitoring setup and let agents apply changes declaratively.
- Self-hosted – runs locally with SQLite. No cloud account, no external dependencies beyond the LLM API keys you choose to configure.
- Project-scoped location context – define named locations per project, set a default, and run explicit or all-location sweeps without making keywords location-owned.
- Scheduled monitoring – set up cron-based recurring runs to track citation changes over time.
- Webhook notifications – get alerted when your citation status changes.
- Audit logging – full history of every action taken through any surface.
CLI Reference
All commands support --format json for machine-readable output.
Setup
canonry init [--force]               # Initialize config and database (interactive)
canonry init --gemini-key <key>      # Initialize non-interactively (flags or env vars)
canonry init --perplexity-key <key>  # Any combination of provider flags works
canonry bootstrap [--force]          # Bootstrap config/database from env vars only
canonry serve [--port 4100] [--base-path /prefix/]   # Start server (foreground)
canonry start [--port 4100] [--base-path /prefix/]   # Start server (background daemon)
canonry stop                         # Stop the background daemon
canonry settings                     # View active provider and quota settings
Non-interactive init flags: --gemini-key, --openai-key, --claude-key, --perplexity-key, --local-url, --local-model, --local-key, --google-client-id, --google-client-secret. Falls back to GEMINI_API_KEY, OPENAI_API_KEY, ANTHROPIC_API_KEY, PERPLEXITY_API_KEY, LOCAL_BASE_URL, LOCAL_MODEL, LOCAL_API_KEY, GOOGLE_CLIENT_ID, GOOGLE_CLIENT_SECRET env vars.
Projects
canonry project create <name> --domain <domain> --country US --language en
canonry project list
canonry project show <name>
canonry project delete <name>
canonry project add-location <name> --label <label> --city <city> --region <region> --country <country>
canonry project locations <name>
canonry project set-default-location <name> <label>
canonry project remove-location <name> <label>
Keywords and Competitors
canonry keyword add <project> "keyword one" "keyword two"
canonry keyword list <project>
canonry keyword import <project> <file.csv>
canonry keyword generate <project> --provider gemini [--count 10] [--save]

canonry competitor add <project> competitor1.com competitor2.com
canonry competitor list <project>
Visibility Runs
canonry run <project>                    # Run all configured providers
canonry run <project> --provider gemini  # Run a single provider
canonry run <project> --location sf      # Run with one configured project location
canonry run <project> --all-locations    # Fan out one run per configured location
canonry run <project> --no-location      # Explicitly skip location context
canonry run <project> --wait             # Trigger and wait for completion
canonry run --all                        # Trigger runs for all projects
canonry run show <id>                    # Show run details and snapshots
canonry runs <project>                   # List past runs
canonry status <project>                 # Current visibility summary
canonry evidence <project>               # View citation evidence
canonry history <project>                # Per-keyword citation timeline
canonry export <project>                 # Export project as YAML
Config-as-Code
canonry apply canonry.yaml                   # Single project
canonry apply projects/*.yaml                # Multiple files
canonry apply multi-projects.yaml            # Multi-doc YAML (---separated)
Scheduling and Notifications
canonry schedule set <project> --preset daily        # Use a preset
canonry schedule set <project> --cron "0 8 * * *"    # Use a cron expression
canonry schedule set <project> --preset daily --provider gemini openai
canonry schedule show <project>
canonry schedule enable <project>
canonry schedule disable <project>
canonry schedule remove <project>

canonry notify add <project> --webhook https://hooks.slack.com/... --events run.completed,citation.changed
canonry notify list <project>
canonry notify remove <project> <id>
canonry notify test <project> <id>
canonry notify events                    # List available event types
Schedule presets: daily, weekly, twice-daily, daily@HH, weekly@DAY.
Provider Settings
canonry settings                         # Show all providers and quotas
canonry settings provider gemini --api-key <key>
canonry settings google --client-id <id> --client-secret <secret>
canonry settings provider local --base-url http://localhost:11434/v1 --model llama3
canonry settings provider openai --api-key <key> --max-per-day 1000 --max-per-minute 20
canonry settings provider perplexity --api-key <key>
Quota flags: --max-concurrent, --max-per-minute, --max-per-day.
Telemetry
canonry telemetry status                 # Show telemetry status
canonry telemetry enable                 # Enable anonymous telemetry
canonry telemetry disable                # Disable anonymous telemetry
Telemetry is automatically disabled when CANONRY_TELEMETRY_DISABLED=1, DO_NOT_TRACK=1, or a CI environment is detected.
Config-as-Code
Define your monitoring projects in version-controlled YAML files:
apiVersion: canonry/v1
kind: Project
metadata:
  name: my-project
spec:
  displayName: My Project
  canonicalDomain: example.com
  country: US
  language: en
  keywords:
    - best dental implants near me
    - emergency dentist open now
  competitors:
    - competitor.com
  providers:
    - gemini
    - openai
    - claude
    - perplexity
    - local
  locations:
    - label: sf
      city: San Francisco
      region: California
      country: US
      timezone: America/Los_Angeles
    - label: nyc
      city: New York
      region: New York
      country: US
      timezone: America/New_York
  defaultLocation: sf
Locations are project-scoped run context. Keywords remain project-wide; choose the location at run time via the default location or the canonry run location flags.
Apply with the CLI or the API. Multiple projects can live in one file separated by ---, or pass multiple files:
canonry apply canonry.yaml
canonry apply project-a.yaml project-b.yaml
curl -X POST http://localhost:4100/api/v1/apply \
  -H "Authorization: Bearer cnry_..." \
  -H "Content-Type: application/yaml" \
  --data-binary @canonry.yaml
Applied project YAML is declarative input. Runtime project/run data lives in the database, while local authentication and provider credentials live in ~/.canonry/config.yaml.
Provider Setup
Canonry queries multiple AI answer engines. Configure the providers you want during canonry init, or add them later via the settings page or API.
For authentication material, the local config file at ~/.canonry/config.yaml is the source of truth. Provider API keys, Google OAuth client credentials, and Google OAuth tokens are stored there with file mode 0600.
Gemini
Get an API key from Google AI Studio.
Google Search Console
Create OAuth client credentials in Google Cloud, then store them locally:
canonry settings google --client-id <id> --client-secret <secret>
After that, connect a project with:
canonry google connect <project> --type gsc
The web dashboard now supports the same flow:
- Configure Google OAuth once on the Settings page.
- Open a project and generate the Google consent link for that canonical domain.
- Select the matching Search Console property in the project dashboard.
- Queue syncs, inspect URLs, review inspection history, and review deindexed pages from the same project view.
OpenAI
Get an API key from platform.openai.com.
Claude
Get an API key from console.anthropic.com.
Perplexity
Get an API key from perplexity.ai/settings/api. Perplexity uses its Sonar model family with built-in web search, so citation results reflect live search grounding.
canonry settings provider perplexity --api-key <key>
Available models: sonar (default), sonar-pro, sonar-reasoning, sonar-reasoning-pro.
Local LLMs
Any OpenAI-compatible endpoint works – Ollama, LM Studio, llama.cpp, vLLM, and similar tools. Configure via canonry init, the settings page, or the CLI:
canonry settings provider local --base-url http://localhost:11434/v1
canonry settings provider local --base-url http://localhost:11434/v1 --model llama3
The base URL is the only required field. API key is optional (most local servers don’t need one).
Note: Unless your local model has web search capabilities, responses will be based solely on its training data. Cloud providers (Gemini, OpenAI, Claude) use live web search to ground their answers, which produces more accurate citation results. Local LLMs are best used for comparing how different models perceive your brand without real-time search context.
API
All endpoints are served under /api/v1/. Authenticate with a bearer token:
Authorization: Bearer cnry_...
Key endpoints:
| Method | Path | Description |
|---|---|---|
PUT |
/api/v1/projects/{name} |
Create or update a project |
POST |
/api/v1/projects/{name}/runs |
Trigger a visibility sweep |
GET |
/api/v1/projects/{name}/timeline |
Per-keyword citation history |
GET |
/api/v1/projects/{name}/snapshots/diff |
Compare two runs |
POST |
/api/v1/apply |
Config-as-code apply |
GET |
/api/v1/openapi.json |
OpenAPI spec (no auth required) |
Web Dashboard
The bundled web dashboard provides five views:
- Overview – portfolio-level visibility scores across all projects with sparkline trends.
- Project – command center with score gauges, keyword evidence tables, and competitor analysis.
- Runs – history of all visibility sweeps with per-provider breakdowns.
- Settings – provider configuration, scheduling, and notification management.
- Setup – guided wizard for first-time onboarding.
Access it at http://localhost:4100 after running canonry serve.
Requirements
- Node.js >= 20
- At least one provider API key to run visibility sweeps (configurable after startup via the dashboard or CLI)
- A C++ toolchain for building
better-sqlite3native bindings (only needed if prebuilt binaries aren’t available for your platform)
Native dependency setup
Canonry uses better-sqlite3 for its embedded database. Prebuilt binaries are downloaded automatically for most platforms, but if npm install fails with a node-gyp error, you need to install build tools:
macOS:
xcode-select --install
Debian / Ubuntu:
sudo apt-get install -y python3 make g++
Alpine Linux (Docker):
apk add --no-cache python3 make g++ gcc musl-dev
Windows:
npm install -g windows-build-tools
If you’re running in a minimal Docker image or CI environment without these tools, the install will fail. See the better-sqlite3 troubleshooting guide for additional help.
Development
git clone https://github.com/ainyc/canonry.git
cd canonry
pnpm install
pnpm run typecheck
pnpm run test
pnpm run lint
pnpm run dev:web          # Run SPA in dev mode
Deployment
See docs/deployment.md for the full guide covering local, reverse proxy (Caddy/nginx), sub-path, Tailscale, systemd, and Docker.
Sub-path deployments
Serve canonry under a URL prefix without rebuilding:
canonry serve --base-path /canonry/
The server injects the base path at runtime, so no build-time config is needed.
Docker Deployment
Canonry currently deploys as a single Node.js service with a SQLite file on persistent disk.
The repo includes a production Dockerfile and entry script. The default container entrypoint runs canonry bootstrap and then canonry serve.
docker build -t canonry .

docker run --rm \
  -p 4100:4100 \
  -e PORT=4100 \
  -e CANONRY_CONFIG_DIR=/data/canonry \
  -e GEMINI_API_KEY=your-key \
  -v canonry-data:/data \
  canonry
Published container images are available on Docker Hub:
docker pull arberx/canonry:latest
The same image is also published to GitHub Container Registry:
docker pull ghcr.io/ainyc/canonry:latest
Keep the container to a single replica and mount persistent storage at /data so SQLite and config.yaml survive restarts.
No CORS configuration is required for this Docker setup. The dashboard and API are served by the same Canonry process on the same origin. CORS only becomes relevant if you split the frontend and API onto different domains.
Deploy on Railway or Render
Use the repo root as the service root. @ainyc/canonry depends on shared workspace packages under packages/*, so deploying from a subdirectory will break the build.
Canonry runs as a single service – the API, web dashboard, and job scheduler all run in one process. No provider API keys are required at startup; configure them later through the web dashboard.
Railway

One-click deploy:
- Click the button above (or create a service from this repo manually)
- Railway builds the
Dockerfileautomatically – no custom build or start commands needed - Right-click the service and select Create Volume, set the mount path to
/data - Generate a public domain under Settings > Networking (port
8080) - Open the dashboard and follow the setup wizard to configure providers and create your first project
Manual setup:
- Create a new service from this GitHub repo
- Dockerfile Path:
Dockerfile(the default) - Custom Build Command: leave empty
- Custom Start Command: leave empty
- Add a Volume mounted at
/data(right-click the service > Create Volume) - Generate a public domain under Settings > Networking
- No environment variables are required to start – the bootstrap creates a SQLite database and API key automatically
Optional environment variables:
| Variable | Description |
|---|---|
GEMINI_API_KEY |
Google Gemini provider key |
OPENAI_API_KEY |
OpenAI provider key |
ANTHROPIC_API_KEY |
Anthropic/Claude provider key |
PERPLEXITY_API_KEY |
Perplexity provider key |
LOCAL_BASE_URL |
Local LLM endpoint (Ollama, LM Studio, etc.) |
CANONRY_API_KEY |
Pin a specific API key instead of auto-generating one |
Provider keys can also be configured at any time via the Settings page in the dashboard.
Keep the service to a single replica – SQLite does not support concurrent writers.
Render
Create one Web Service from this repo with runtime Docker, then attach a persistent disk mounted at /data.
- Leave build and start commands unset so Render uses the image
ENTRYPOINT. - Health check path:
/health - No environment variables are required at startup. Configure providers via the dashboard.
SQLite should live on the persistent disk, so keep the service to a single instance.
Contributing
Contributions are welcome. See CONTRIBUTING.md for setup instructions.
License
FSL-1.1-ALv2. Free to use, modify, and self-host. Each version converts to Apache 2.0 after two years.
Built by AI NYC